Got a Raspberry Pi and some spare time? Why not have a play with some LiDAR #opendata? Enjoy!
The point of this post is to:
- show you that you can use inexpensive kit at home to have a play with LiDAR data
- serve as an updatable set of instructions
- show you how easy it is (if I can do it, you can too)
Mike Rose once wrote: 'When Defra group released over 10,000 sets of data in a single year, the most interest and press appeared to be around the release of the remote survey LiDAR data. We have shared on this blog some of the uses that this has been put to other than that which it was originally collected – we call it ‘minecraft to roman roads’ and we love every example we find.'
(Thanks Mike!)
...So it’s right that LiDAR is very popular. The Environment Agency have just expanded their offering of LiDAR open data over a greater area and in many cases at finer resolution than ever before!
NOW LIVE! New 2016 #LIDAR Composite DSM & DTM https://t.co/BPYP4Ng61m. 18000 sq km new LIDAR data since last release #opendata #defradata pic.twitter.com/vFEyizJccX
— Env Agency Geomatics (@EnvAgencyGeomat) April 5, 2017
We know for a fact that it impresses everyone from amateur archaeologists, who periodically call the Environment Agency to ask how to access and use it, to no doubt otherwise-jaded schools groups (the cynical view, of course – kids are still curious, deserve opportunities and enthusiastic teaching, and technological understanding can be part of that rather than a barrier or distraction). We’ve shown it at marketplace events and other show ‘n’ tells for Defra and wider government to show the power of LiDAR. Usually we also have another screen running with some nice LiDAR visuals from other people who are good at visualising LiDAR or building stuff that helps other visualise LiDAR.
What those calls to the Environment Agency from amateur archeologists looking for lost Roman Roads (which may well have themselves been Celtic) mean is that there is a #userneed for a set of simple instructions on how to get LiDAR data on inexpensive kit at home. In this post I’ll point you to what I’ve done before.
What kind of thing are you talking about?
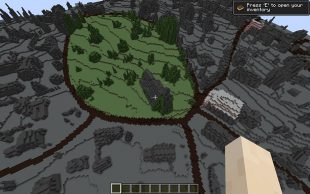
Well, QGIS on a Mac...and an older version on a Raspberry Pi. This is perhaps more arcane than the most popular use of LiDAR...getting it into Minecraft, so we’ll go with most popular first. As always there’s a tradeoff between cost, simplicity and time/frustration.
LiDAR into Minecraft on a Mac and on a Raspberry Pi
A very simple way for those with a Mac is to use Christopher Gutteridge’s Geocraft perl script, which is updated so frequently he actually updated it in the few hours I was working on this post (during which I also tried to do an impromptu show and tell to some GDS people who dropped by – didn’t work but that was due to our wifi rather than the script. I slunk out in an inglorious funk).
The Mac version is easier and quicker to set up...your biggest barrier is cost: Macs aren’t cheap, but you could get an older or refurbished one. But Minecraft also costs money on a Mac, whereas the (admittedly older version) of Minecraft on a Pi doesn’t.
Here goes...
This assumes you have a working version of Minecraft installed and that you’re connected to the web. It downloads a fair bit of data, so make sure this won’t be a problem (ie consult the bill payer, or make sure you’re not going to be charged a lot of money for mobile data). You can download the latest version of Geocraft here.
You don't need to be massively au fait with the command line ('Terminal' in a Mac's Utilities folder); you just need a bit of confidence if it isn't something you've done much of before. You could brush up on basics here if you’re unsure if you’re confident or not!
Assuming the zip file downloads into Downloads in your home folder, simply navigate there, expand the zip if it hasn’t automatically done so, and then open terminal.
Type ‘cd ‘ (with the space) and drag the folder icon for geocraft-master into the terminal window (you can also just type ‘cd ~/Downloads/geocraft-master’). Geocraft uses an executable perl script called ‘generate-world’ in the Geocraft folder, so simply typing (or in fact, copying and pasting)
‘./generate-world --save ~/Library/Application\ Support/minecraft/saves --postcode TW123DN --size 1000 Roygrove’
alternatively you could just drop the --saves flag and manually add (or remove) generated worlds from you Mincecraft saves folder
— pulls LiDAR data from the Environment Agency’s geostore (where all the EA LiDAR lives on t'Internet). In fact, the line above specifically pulls in data centred on Roy Grove in Hampton, where Major General William Roy sited the first triangulation point for a series of surveys, culminating in measuring the distance between the Greenwich and Paris observatories, that would lay the groundwork for what would become the Ordnance Survey (the 1791 Map of Kent is a product of this survey).
You can replace the postcode with whatever postcode you like, noting that it needs to be entered in the command as a single string (not a city/area_street format with a space).
When you load up Minecraft, you should be able to see the world Roygrove and select it. You can then fly over this auspicious area of Hampton, but if you don’t either live in Hampton or appreciate the history of maps (and if you don’t, why are you reading this?) you could fly over Telford or Peterborough.
Windows...and Raspberry Pi
If you’ve got a Windows PC, the best solution is to abandon it altogether, but if you must keep it, you can augment it with a Raspberry Pi and follow the instructions below. (sorry, there probably is a way to do this on Windows. But looking at comments on message boards, Perl on Windows is a mysterious beast and people have had issues before. I'll update this if people contact me in fury.)
Instructions from hereon in are as good as I can make them. They could be wrong (in fact, they seem to have gotten simpler since I first tried). If they are, please update this hackpad and I’ll do my best to incorporate them back here. I should probably be doing this on our Gitlab account but Hackpad seems relatively frictionless.
If you’re starting from scratch, you can use Noobs or something like Berryboot to take the pain away from installing Raspbian, which is the OS distro most RPi users use (it isn’t that hard to copy a Raspbian image onto an SD card, which the Pi uses to boot, using dd on a Mac, but we’ve already done Mac so let’s use Noobs). Noobs allows you to download a recent version of Raspbian. But even so, upon booting you should probably update stuff on your Pi.
Open terminal and issue the following commands:
sudo apt-get update
sudo apt-get upgrade
You’ll need the Archive::Zip perl package. You can install it with
perl -M Archive::ZIP -e 'print "OK\n";'
Which will say 'OK' if everything worked out.
(you used to need Image::Magick too, which I tried installing from source before realising how to install perl libraries. Thankfully Chris made this much simpler a while back)
If you do get an error from the above command, I’ve heard it said that you may want to install perl separately. Perhaps nudge me @ndajz and I’ll do my best to ask someone who knows the answer (or help you myself if I can).
You can then follow the above instructions for a Mac to get hold of the current version of the script. Minecraft isn’t as advanced on a Pi, but it is there for free. You should note that the saves folder location means that the command on a Pi is:
./generate-world --save ~/.minecraft/saves/ --postcode ZzNnYXW --size 1000
(Replacing gibberish postcode)
Some great projects have been run using a Minecraft Pi and LiDAR, notably by Chris Gutteridge himself, ODI Devon’s Lucy Knight and others. See below for more details.
QGis on a Mac
QGis might not immediately sound as fun as Minecraft, but it does provide some proper GIS analytical tools in a full-featured open source platform. You can also make some nice visuals from it, including rotatable images in a web browser.
This assumes that you have admin rights and are comfortable tweaking security settings, as Apple lock down their OS more than they used to (Snow Leopard was a high point, IMO). You’ll first need to install GDAL from this page: http://www.kyngchaos.com/software/frameworks
And then QGIS from here (with those security settings tweaked – advice given on download page)
At this point, I’m going to hand over to this blog post to tell you what you can do with it (otherwise you’d be about to witness the stickiest plagiarism incident since Sticky the Stick Insect got stuck on a sticky bun). It’s also what I did to get this image of Nobel House, aka home of Defra (I needed to figure out the LiDAR tile that Smith Square square is in – the most challenging part.
And on a Pi?
The method (I’m pretty sure) I used was to change the sources for apt-get as follows (because QGis doesn't offer Arm packages any more)
Go to terminal and type:
sudo vi /etc/apt/sources.list # or use your favourite editor
change all references of wheezy to jessie
sudo apt-get update
sudo apt-get upgrade # this will take a long time, with occasional user prompts
sudo apt-get dist-upgrade # this will take a very long time …
Install qgis: sudo apt-get install gdal-bin qgis
This will install QGIS 2.2.
Which is pretty cool, given you’re installing a full featured GIS package on a computer that could cost as little as £4.
Again, please feel free to comment in the Hackpad
So...there you have it. Hopefully you have some fun with LiDAR for not much money and a bit of tinkering. Enjoy!
Recent Comments